Fix for LCD Replacement Mod Blinking
You may have noticed that after you upgraded the LCD in your system to a new one, it starts to blink after a short time (it generally happens when using rechargeable batteries). The issue is that some replacement LCDs have a higher minimum voltage threshold than others. When ordering a replacement screen, it can be hard to figure out what the minimum voltage is. If you bought an LCD with a lower minimum voltage than the system you are using, the screen will blink as the battery voltage drops.
There are two ways to fix this problem. Method 2 is preferred and greatly increases battery life but method 1 is the easiest.
Method 1
This method uses an external DC to DC converter. You may be asking yourself, “Why would I want to convert DC to DC?” The answer is this: Because you can convert a lower voltage to a higher voltage. When using a DC to DC step up converter, as the battery voltage drops, your output voltage would remain the same. That means no more blinking LCDs! Battery life will be decreased when using a DC to DC converter to increase the voltage. Anyway, let’s get to it!
If you have not purchased your LCD yet, consider purchasing the LCD/Converter combo from our store (US residents only).
Here is a list of what you need along with affiliate links to purchase them:
Although I am using a Sega Nomad in my pictures, this applies to any system where the LCD can be replaced (assuming there is enough space for the converter).
Step 1:
Connect the inputs of the converter to your system (where your LCD normally gets power).
Step 2:
Turn on the system and measure the output voltage. Adjust the potentiometer until you get a reading of about 10.5 Volts.
Step 3:
Turn off the system and connect the outputs of the converter to the LCD you want to use. Also, make sure the composite input of the LCD is connected to the system.
Step 4:
Turn on the system with a game in it. If you see a picture, decrease the voltage with the potentiometer until the screen starts blinking. If the screen is off, make sure you have everything connected properly. If so, continue to step 5.

Step 5:
Now, increase the voltage with the potentiometer until the screen is on and not blinking, then turn it a tad more. This is where we are going to leave it.
Step 6:
If you were using an AC adapter, this is a good time to test it with the batteries. The ideal test would be letting it run until the batteries die. This way you can see that the LCD does not blink at all.
Step 7:
If the LCD did not blink, mount the converter in the system (I used hot glue to mount it). If you are concerned that the potentiometer might be moved when putting your system back together, you can use some hot glue on it to keep it in place. If the LCD did blink, increase the voltage output to the rated voltage of the LCD.

Method 2
In method 1 you add a DC-DC step up converter to increase the voltage for the LCD driver board. In method 2 you don’t use a DC-DC converter at all. Most of the LCDs you can buy are meant to be used with vehicle backup cameras. The LCD driver boards are designed to accept 12 VDC from a vehicle. The LCD driver board takes the 12 VDC and steps it down to around 5 VDC. In method 2 you use a 5 VDC source and bypass the DC-DC converter on the LCD driver board. If you are using the recommended LCD/driver board, solder a wire to jumper these points:
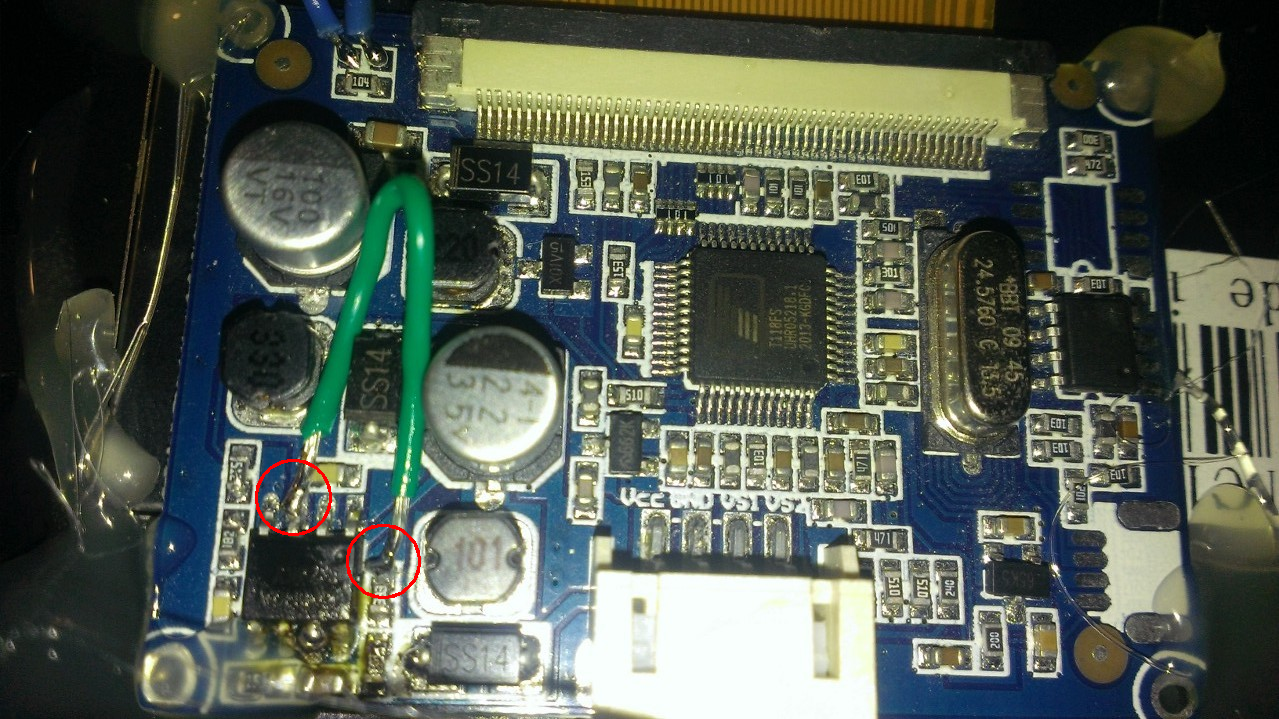
If you have a different LCD driver board you will have to figure out where the DC-DC step down converter is. If you aren’t up to it then I’d stick with method 1.
Once you do this DO NOT connect this to anything greater than 5 Volts! If you are doing the Sega Nomad Mod you need to use this voltage point instead of the one near the power connector to power the LCD:
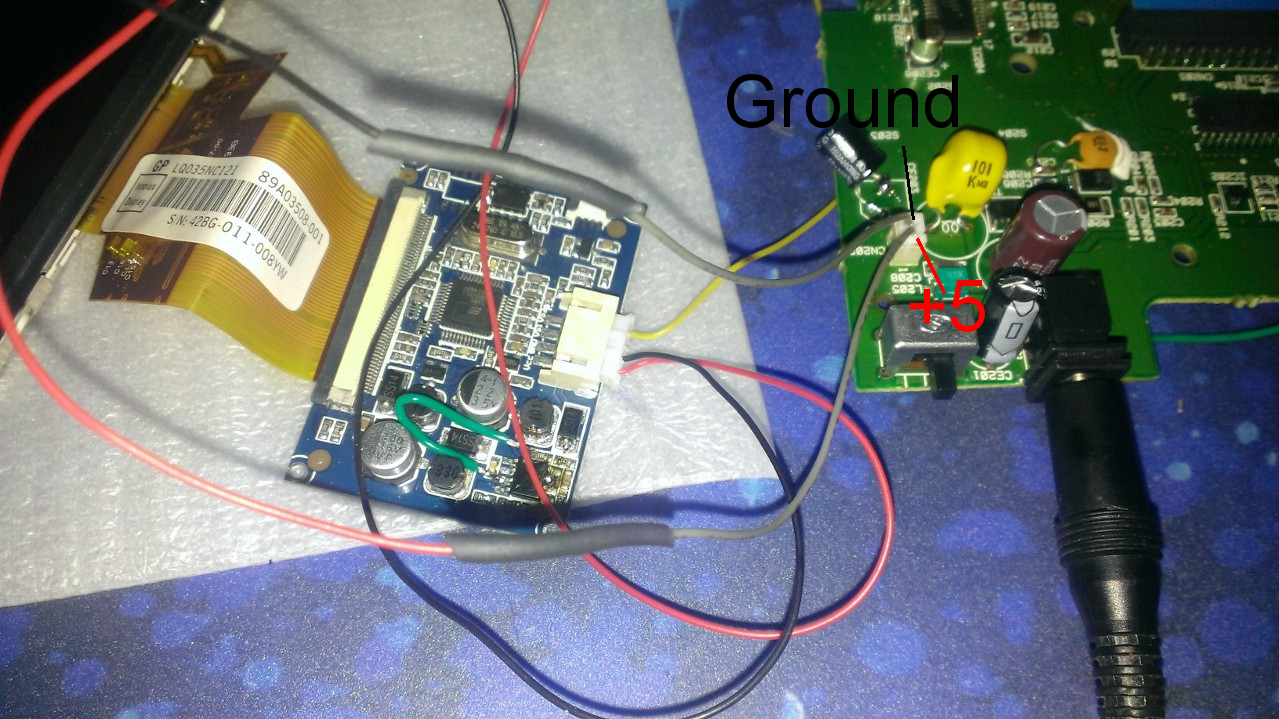
You can reuse the connector from the old LCD when using this method which makes it a bit cleaner.
That is it! You now have a system with an upgraded LCD that doesn’t blink. Let me know if you have any questions.


Why is method 2 preferred and why is it harder? It seems to me from reading this method 2 would be the easiest solution. I have a Nomad with a 7.4v 2500mah lithium battery pack I made for it and I plan to make another. I bought a screen from your store and it’s arriving today. What method should I use to install it?
Method 2 is preferred because it will increase your battery life quite a bit. It can be a tad harder depending on your soldering skill as you have to solder a jumper wire to smaller components on the LCD driver board. Both methods will work but I recommend method 2 if you are up to soldering the jumper wire.
Thanks for the reply. I noticed you said not to connect anything greater than 5 Volts. Would method 2 be okay with the battery pack I made? I’m not very versed in electronics. I can solder pretty well so I just do as told on stuff like this! Just want to make sure I cover all the bases before I screw something up.
The LCD screen is connected to the old power connector on the board for method 2 (+5 volts). If you jumper those connections on the LCD board (method 2) then do not connect it any other way.
Another thing. Last night I put the screen in without doing either of these. I made the rechargeable battery from the same parts a member of a forum used. He claims to get upwards of five hours of battery life off of it. I played for an hour or so off the battery freshly charged after I got the mod done. I set it aside overnight and came back this morning to play it and the screen started dreadfully blinking. Could the battery have drained overnight? Is it best to unhook the battery when not playing? Or could it be something else giving me crappy battery life?
If you did not use method 1 or 2 for the blinking fix then the battery is not supplying enough power for the screen.
Sorry about all the questions and replies. I had the chance to pull out my multimeter after the blinking started and check the voltage on the battery and it read 7.6 Volts.
I read you now. I think I misread something earlier. Please excuse my ignorance. To clarify I am not getting the low battery light coming on. How long do you think this battery will last with method 2?
Thanks for the tutorial! I just ordered one of the LCD kits for my Nomad.
When you say not to connect to anything higher than 5v, do I have to stop using either my 6AA battery pack or my AC adapter, or are those still safe after the mod?
You can use the battery pack and adapter. When I say don’t connect it to anything higher than 5V I mean you have to find a 5V spot on the board like the Nomad LCD power connector (shown in method 2 of this post) instead of the 12V spot (shown in method 1 and the original Nomad LCD upgrade guide).
You absolute legend. I built my own battery using a camcorder and USB charger and was getting exactly 2 hours before the flickering started. I just completed this mod this morning, which was pretty tough considering how small the board and solder points are.
I have it up and running now and am waiting to see how long it goes for with this update
Thanks for all the info
Great guide. I installed the screen, had the blinking problem, found this guide, and used method 2 to fix in one dramatic night. With a fine-tipped, variable temp soldering iron, I wouldn’t say this was very difficult.